Page 84 of 337 FirstFirst ... 3474828384858694134184 ... LastLast
Results 1,246 to 1,260 of 5049

Thread: The Bucket Foundry

  1. #1246
    Join Date
    10th February 2005 - 20:25
    Bike
    1944 RE 1
    Location
    Auckland, New Zealand.
    Posts
    2,244
    Quote Originally Posted by Flettner View Post
    Give it the spark test

    If you want real nice stuff to turn use Armorboard and glue bits together with 24Hr two pot high strength glue (arildite). It turns a little like free machining alloy.
    I do use whatever wood I can so long as its dry and not full of natural oils like Kauri.
    Thanks everybody for all the replies,
    Was thinking of using Kauri but have now changed my mind, maybe try Armorboard, but I'll keep my eyes open and try anything that looks right!
    Maybe PVA glue isn't a helluva good idea either.

    I do remember seeing your sander for doing the draught angles quite a few pages ago, trouble is the longer the thread goes on, the harder it is to find it all again!

    It would seem that all the foundry processes are based on intuition! - more or less like bakeries.
    Everything takes time and all this stuff obviously can't be learnt from just a book or a video, but I guess they all do play a part.

  2. #1247
    Join Date
    24th July 2006 - 11:53
    Bike
    KTM 1290 SAR
    Location
    Wgtn
    Posts
    5,541
    Quote Originally Posted by WilDun View Post
    Thanks everybody for all the replies,
    Was thinking of using Kauri but have now changed my mind, maybe try Armorboard, but I'll keep my eyes open and try anything that looks right!
    Maybe PVA glue isn't a helluva good idea either.

    I do remember seeing your sander for doing the draught angles quite a few pages ago, trouble is the longer the thread goes on, the harder it is to find it all again!

    It would seem that all the foundry processes are based on intuition! - more or less like bakeries.
    Everything takes time and all this stuff obviously can't be learnt from just a book or a video, but I guess they all do play a part.
    I couldn't find it either.

    I suspect it's like this: https://www.google.co.nz/search?q=sa...3QyrI99cuJ4%3D

    I have a similar one, 14" dia in steel rather than alloy, but mine doesn't have the table adjustable for angle.

    I can also recommend armourboard. For shapes requiring more than just a standard draught, (curved in both axis) I used to model 3D shapes in Rhino, scale the shape by the shrinkage factor, section the shapes at 10mm offests, print the sections 1:1, stick the printed sections onto 10mm armourboard, bandsaw them out carefully and glue them together with polyester resin. Just a matter of dressing the steps off and there's your mould.
    Go soothingly on the grease mud, as there lurks the skid demon

  3. #1248
    Join Date
    12th March 2010 - 16:56
    Bike
    TT500 F9 Kawasaki EFI
    Location
    Hamilton New Zealand
    Posts
    2,882
    Quote Originally Posted by Ocean1 View Post
    I couldn't find it either.

    I suspect it's like this: https://www.google.co.nz/search?q=sa...3QyrI99cuJ4%3D

    I have a similar one, 14" dia in steel rather than alloy, but mine doesn't have the table adjustable for angle.

    I can also recommend armourboard. For shapes requiring more than just a standard draught, (curved in both axis) I used to model 3D shapes in Rhino, scale the shape by the shrinkage factor, section the shapes at 10mm offests, print the sections 1:1, stick the printed sections onto 10mm armourboard, bandsaw them out carefully and glue them together with polyester resin. Just a matter of dressing the steps off and there's your mould.
    Yes that's it, but you do need to be able to angle the table to easily get your draft angles. This type of sander is good for making both flat sided and round components, lugs etc.
    Ironicly my next engine will be carved from solid alloy, no castings apart from the cylinder and perhaps a side case or two.
    Next time I'm doing some pattern making I'll get Gerbilgronk to do some video so you can see how I do it, to be clear, not necessarily the right way though it just works for me.

  4. #1249
    Join Date
    24th July 2006 - 11:53
    Bike
    KTM 1290 SAR
    Location
    Wgtn
    Posts
    5,541
    Quote Originally Posted by Flettner View Post
    Yes that's it, but you do need to be able to angle the table to easily get your draft angles. This type of sander is good for making both flat sided and round components, lugs etc.
    Aye. I built mine 20 yrs ago while twiddling my thumbs waiting for work to flood in to my new business. I got busy almost immediately, so it got finished quickly and I haven't had tome to add the angle adjustment feature since.

    I'll get around to it, in the meantime it's still one of the most used weapons in the shop.
    Go soothingly on the grease mud, as there lurks the skid demon

  5. #1250
    Join Date
    12th March 2010 - 16:56
    Bike
    TT500 F9 Kawasaki EFI
    Location
    Hamilton New Zealand
    Posts
    2,882
    Quote Originally Posted by ken seeber View Post
    Back in town. The video was pretty good, old mate seems to know his stuff. When I saw brake cleaner, I automatically thought of using metho, same as Willy. Schnapps is for drinking I believe.
    Over here, we get particle board (or chipboard) and then MDF which is harder and denser. This is not too bad in that the centre is reasonably well packed. The bloke next to us does a lot of CNC routing, and the sheets are held down by vacuum. However, to allow the cutters to go slightly beyond the thickness of the material being cut (chipboard, MDF, plastics and aluminium etc), he uses a sacrificial board of 5 mm chipboard on top of the machine bed, that eventually has to be replaced after it gets too many cutter paths in it. The point of this is that the 5 mm chipboard is porous enough to allow a vacuum (of unknown pressure) to be maintained between it and the job, despite the various leakages. Bit of trivia really.

    While in the good old mother country, I went to the Imperial Science Museum and had a squiz at the steam section, you know, James Watt and all his mates. There was a model of a beam engine. See pics at various positions. Quality is poor due to it being in a glass case. There is a linkage mechanism there which seems to provide some sort of compensation allowance for the radius of swing of the beam so that it provides a planar force onto the end of the piston rod. Can't see it doing 30k though.


    Attachment 313386Attachment 313387Attachment 313388Attachment 313389Attachment 313390


    CO2 sand. My experience is that a sand core, once gassed, does not have a very long life before it begins to lose its strength and is easily crumbled. This might be a matter of hours or a half day or so, possibly dependent on temps and humidity. Is this your experience Neil? Shell cores are great, they last forever, but need heat and metal moulds. I guess it, as always, is dependent on the job, design maturity and quantities etc.
    We are just looking at a small con rod? am I right? Is that what the small rods are for?
    Yes CO2 sand doesn't last a long time, make them when you need them but they will last more than a week I've found. Don't let them soak up water, keep them on the hot water cylinder.
    I make the core boxes in wood/bondifil/casting resin (CO2 sand) first then if the castings go well and I want more I copy cast these wood core boxes into aluminium so I can use them to make Shell sand cores (hot set), MUCH better in the long run.

    What a turn of events, I rode my first trail ride post hip job (and patch up) yesterday. Wrong day to try the hip out, it was the wettest I've riden in for years, slippery, rutted and not fun but I made it without damage. I never thought I would be doing that again. Had to go to Blackwood Yamaha and ask for my YZ back again, I couldn't get rid of the YZ even if I couldn't ride again, best MX/trailbike ever made.

  6. #1251
    Join Date
    10th February 2005 - 20:25
    Bike
    1944 RE 1
    Location
    Auckland, New Zealand.
    Posts
    2,244
    Guess if I were to build one (ie sander), it would need a decent motor to drive it? (ie more than a normal small bench grinder) I'm sure that it would be used for all sorts, not only draught, draft?? angles on patterns,( the British Vs American way of spelling things is "daft") maybe we should invent a Kiwi way of saying it!.

    Although I have dabbled with CAD and do actually use DesignCad 3D a little I haven't as yet gone into the 3D "solid stuff" - would be great to get into CadCam like Rhino etc. but really I think I've left it all a little too late and there's not much point in me wasting my time and money in that stuff (wish all this had been around in 1960). so will just stick to learning the basic foundry stuff,which is quite fulfilling.

    Neil, you reckoned that the best way of turning pine would be to glue it together with the grain positioned the right way, do you mean (for example when turning a round piece), it should be running in a radial direction from the centre to the OD as near as possible?

  7. #1252
    Join Date
    12th March 2010 - 16:56
    Bike
    TT500 F9 Kawasaki EFI
    Location
    Hamilton New Zealand
    Posts
    2,882
    Quote Originally Posted by WilDun View Post
    Guess if I were to build one (ie sander), it would need a decent motor to drive it? (ie more than a normal small bench grinder) I'm sure that it would be used for all sorts, not only draught, draft?? angles on patterns,( the British Vs American way of spelling things is "daft") maybe we should invent a Kiwi way of saying it!.

    Although I have dabbled with CAD and do actually use DesignCad 3D a little I haven't as yet gone into the 3D "solid stuff" - would be great to get into CadCam like Rhino etc. but really I think I've left it all a little too late and there's not much point in me wasting my time and money in that stuff (wish all this had been around in 1960). so will just stick to learning the basic foundry stuff,which is quite fulfilling.

    Neil, you reckoned that the best way of turning pine would be to glue it together with the grain positioned the right way, do you mean (for example when turning a round piece), it should be running in a radial direction from the centre to the OD as near as possible?
    The motor doesn't have to be too big as the disc (steel usually) has a lot of inertia, mine is three phase with an old micro drive (found in some rubbish a business was throwing out) so I can change the speed depending on what I want. Sand paper disc lasts for over a year and is held on with velcro with one half being glued to the steel disc originally. Well worth the time to build one.
    I'll see if I have a picture of glueing/turning pine rings on the lathe somewhere?

  8. #1253
    Join Date
    10th February 2005 - 20:25
    Bike
    1944 RE 1
    Location
    Auckland, New Zealand.
    Posts
    2,244
    Quote Originally Posted by Flettner View Post
    The motor doesn't have to be too big as the disc (steel usually) has a lot of inertia, mine is three phase with an old micro drive (found in some rubbish a business was throwing out) so I can change the speed depending on what I want. Sand paper disc lasts for over a year and is held on with velcro with one half being glued to the steel disc originally. Well worth the time to build one.
    I'll see if I have a picture of glueing/turning pine rings on the lathe somewhere?
    That would be good to have a look at, I've just been having a go with the timber I found earlier after having glued it together yesterday, it has a fairly coarse grain, turned nicely, but I don't think it could be used without bog to fill in the coarse ends of the grain.

    BTW, Please don't get stuck in the mud and try to pull your foot out in the normal way, they say a dislocated hip joint can be an extremely painful thing and a trip in an ambulance all the way from the track is something else! - the YZ might just outlast you!. (I really don't mean to be a killjoy, even if I am, but ....... I have been through the bloody mill myself!).

  9. #1254
    Join Date
    12th March 2010 - 16:56
    Bike
    TT500 F9 Kawasaki EFI
    Location
    Hamilton New Zealand
    Posts
    2,882
    Quote Originally Posted by Flettner View Post


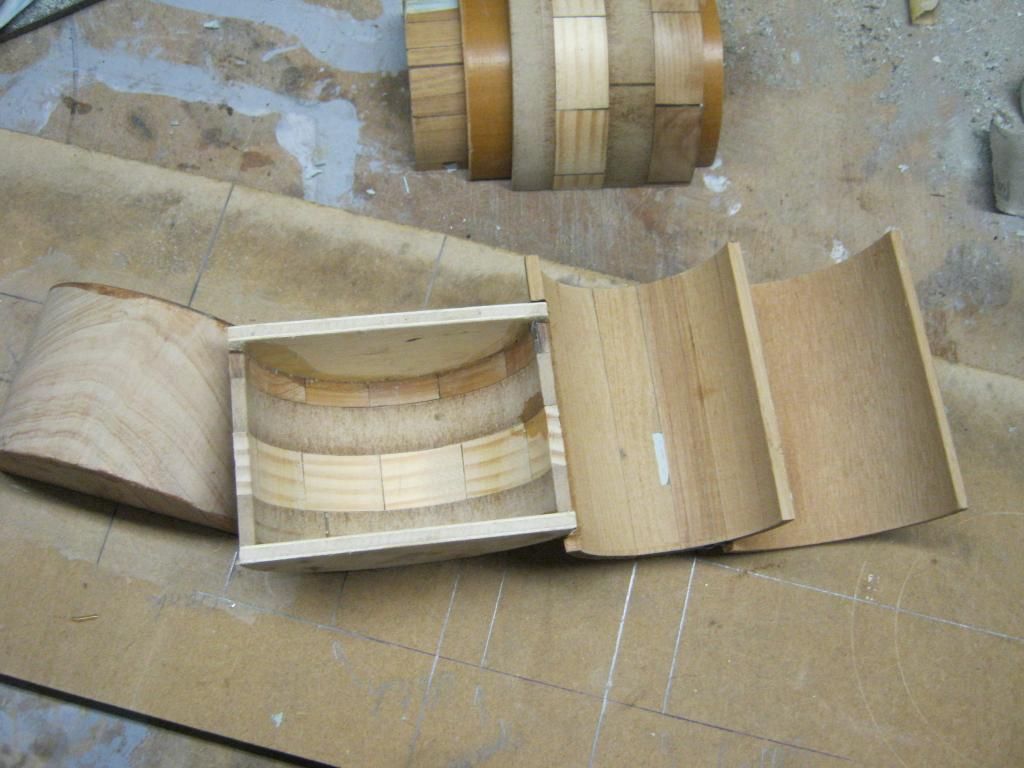
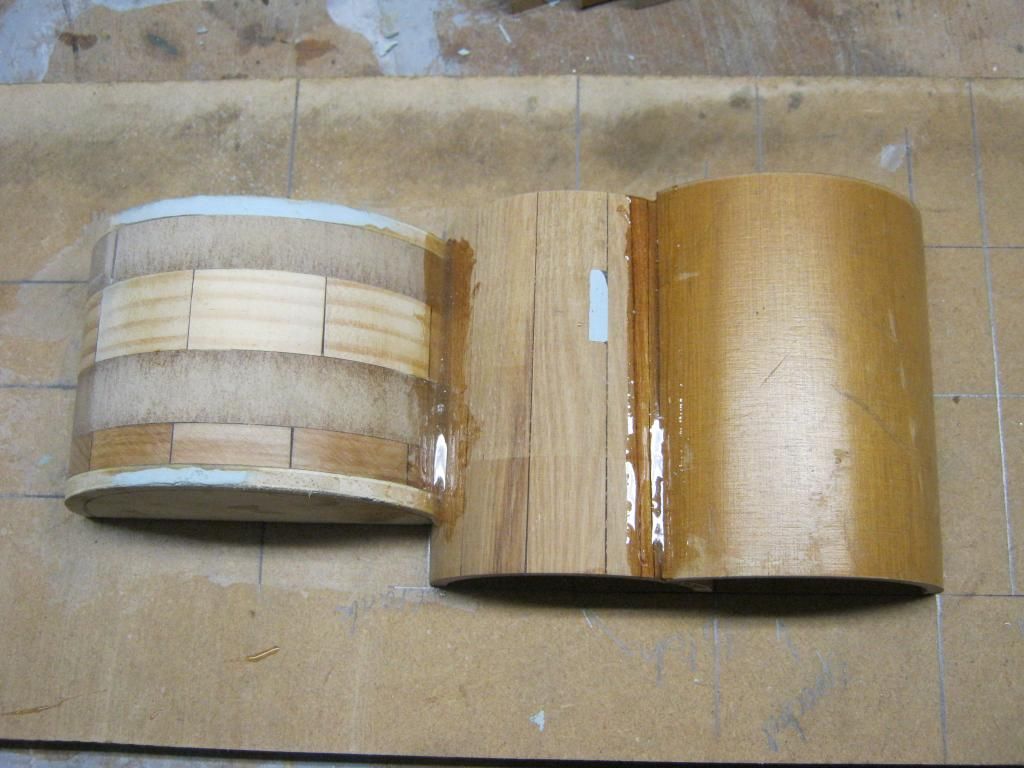
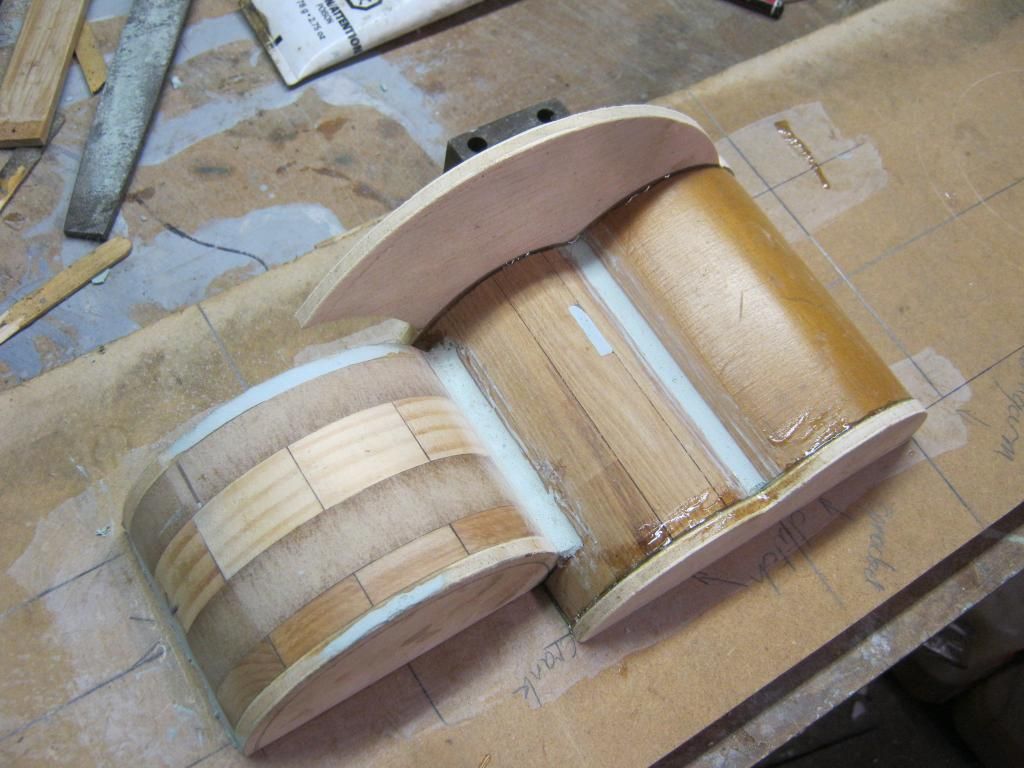
    Horrizontal split case reed.
    See the wood segments been glued end to end to make the upper crank case, with a bit of amorboard inserted.
    Old furniture is usually very dry and stable and generally free.

  10. #1255
    Join Date
    10th February 2005 - 20:25
    Bike
    1944 RE 1
    Location
    Auckland, New Zealand.
    Posts
    2,244
    Quote Originally Posted by Flettner View Post
    See the wood segments been glued end to end to make the upper crank case, with a bit of amorboard inserted.
    Old furniture is usually very dry and stable and generally free.
    Thanks, I now see that so long as the end of the grain isn't exposed, it'll be ok for turning either across the grain or along it. - learning all the time! and I'm sure that free timber offcuts are just about the easiest to find, being everywhere.

    I don't think I would have got this far with a foundry if it wasn't for the fact that I had to "save face" after putting myself on the line and telling you all what I was "gunna" do! - sure helped to keep me honest with myself, ie. about what I can and can't do!

  11. #1256
    Join Date
    24th July 2006 - 11:53
    Bike
    KTM 1290 SAR
    Location
    Wgtn
    Posts
    5,541
    Quote Originally Posted by Flettner View Post
    The motor doesn't have to be too big as the disc (steel usually) has a lot of inertia, mine is three phase with an old micro drive (found in some rubbish a business was throwing out) so I can change the speed depending on what I want. Sand paper disc lasts for over a year and is held on with velcro with one half being glued to the steel disc originally. Well worth the time to build one.
    I'll see if I have a picture of glueing/turning pine rings on the lathe somewhere?
    A mate copied mine, but he used 6mm steel plate for the disk, was too thin, it rings like a bell and causes weird finishes. So it needs to be thick enough to be stable. Doing mine again I'd see if I could find a bit of heavy cast iron, in fact now that I think about it a small car flywheel might be a good place to start, make the drive flange big enough to fill the recess in the centre.

    If single phase is all you've got and you want a decent diameter then you might have to flick it over by hand before hitting the switch...

    I use mine for stainless steel a fair bit, and the heat from that kills anything but silicone carbide, so I buy rolls and cut my own disks and use bear disk cement to glue them straight to the steel. If I wasn't sanding SS I'd be buying the sticky back disks off the shelf.
    Go soothingly on the grease mud, as there lurks the skid demon

  12. #1257
    Join Date
    12th March 2010 - 16:56
    Bike
    TT500 F9 Kawasaki EFI
    Location
    Hamilton New Zealand
    Posts
    2,882
    Quote Originally Posted by Ocean1 View Post
    A mate copied mine, but he used 6mm steel plate for the disk, was too thin, it rings like a bell and causes weird finishes. So it needs to be thick enough to be stable. Doing mine again I'd see if I could find a bit of heavy cast iron, in fact now that I think about it a small car flywheel might be a good place to start, make the drive flange big enough to fill the recess in the centre.

    If single phase is all you've got and you want a decent diameter then you might have to flick it over by hand before hitting the switch...

    I use mine for stainless steel a fair bit, and the heat from that kills anything but silicone carbide, so I buy rolls and cut my own disks and use bear disk cement to glue them straight to the steel. If I wasn't sanding SS I'd be buying the sticky back disks off the shelf.
    I think mine is 20mm steel, 600mm dia. Micro drive starts up well but takes a little time. I ballanced it with a pistol drill and it's been good but lately it's had a bit of a shake on at certain RPM so I had a look for the problem. All my ballance holes had filled up with sawdust, a good blow out and it's fine again. To be fair I haven't used it much lately, it's turned into just another bit of bench space

  13. #1258
    Join Date
    24th July 2006 - 11:53
    Bike
    KTM 1290 SAR
    Location
    Wgtn
    Posts
    5,541
    Quote Originally Posted by Flettner View Post
    I think mine is 20mm steel, 600mm dia. Micro drive starts up well but takes a little time. I ballanced it with a pistol drill and it's been good but lately it's had a bit of a shake on at certain RPM so I had a look for the problem. All my ballance holes had filled up with sawdust, a good blow out and it's fine again. To be fair I haven't used it much lately, it's turned into just another bit of bench space
    Could kill two birds with one Microdrive VFD, use a 3ph motor with a decent shaft size, (>25mm?) and drive it with a 1ph>3ph VFD.
    Go soothingly on the grease mud, as there lurks the skid demon

  14. #1259
    Join Date
    10th February 2005 - 20:25
    Bike
    1944 RE 1
    Location
    Auckland, New Zealand.
    Posts
    2,244
    Quote Originally Posted by Ocean1 View Post
    now that I think about it a small car flywheel might be a good place to start, make the drive flange big enough to fill the recess in the centre.
    If single phase is all you've got and you want a decent diameter then you might have to flick it over by hand before hitting the switch...
    Sounds good, I know a source for big cast iron brake discs and car and truck flywheels all sitting out in the weather waiting to be made into sanding discs for a couple of bucks each!
    I see single phase motors can be had for reasonable prices if you search around for them - I think 3 phase are much cheaper and easier to get (but unfortunately they're not for me).
    Guess it would be possible to rig up a belt drive with a few pulleys which could serve as a clutch as well as a speed changer to give a little motor a chance to get the disc wound up.
    Maybe I'm letting my imagination run away with me here, ie as far as equipment is concerned - my wife's little car already has to stay outside!!

  15. #1260
    Join Date
    12th March 2010 - 16:56
    Bike
    TT500 F9 Kawasaki EFI
    Location
    Hamilton New Zealand
    Posts
    2,882
    Quote Originally Posted by WilDun View Post
    Sounds good, I know a source for big cast iron brake discs and car and truck flywheels all sitting out in the weather waiting to be made into sanding discs for a couple of bucks each!
    I see single phase motors can be had for reasonable prices if you search around for them - I think 3 phase are much cheaper and easier to get (but unfortunately they're not for me).
    Guess it would be possible to rig up a belt drive with a few pulleys which could serve as a clutch as well as a speed changer to give a little motor a chance to get the disc wound up.
    Maybe I'm letting my imagination run away with me here, ie as far as equipment is concerned - my wife's little car already has to stay outside!!
    Probably already told this story, when Claire and I were first married we had a small car shed. The rules were that the car had to go in the shed each night, made work a little difficult some nights and at 10.00 PM it was lights out! There was a lead out to the shed from the wash house and Claire would just switch the power off, no matter what, even if I was half way through a cut on the Boxford lathe as happend one night, broke the cutting tip, wreaked the job. Apparently it was my fault for not being better at reading the time!
    In my opinion cars should stay outside when important work is going on in the car shed anyway.

Thread Information

Users Browsing this Thread

There are currently 1 users browsing this thread. (0 members and 1 guests)

Posting Permissions

  • You may not post new threads
  • You may not post replies
  • You may not post attachments
  • You may not edit your posts
  •