The Duzall really needs a cap on it especially if you store it up high.

 No8 Wire Extraordinaire

The Duzall really needs a cap on it especially if you store it up high.
Don't you look at my accountant.
He's the only one I've got.
Low personal B.M.E.P.

The little rubber caps that come on battery breathers make excellent caps for that.Originally Posted by F5 Dave

No8 Wire Extraordinaire
I've managed to keep mine but the bugger does try to escape on a semi regular basis.
Don't you look at my accountant.
He's the only one I've got.
Anorak
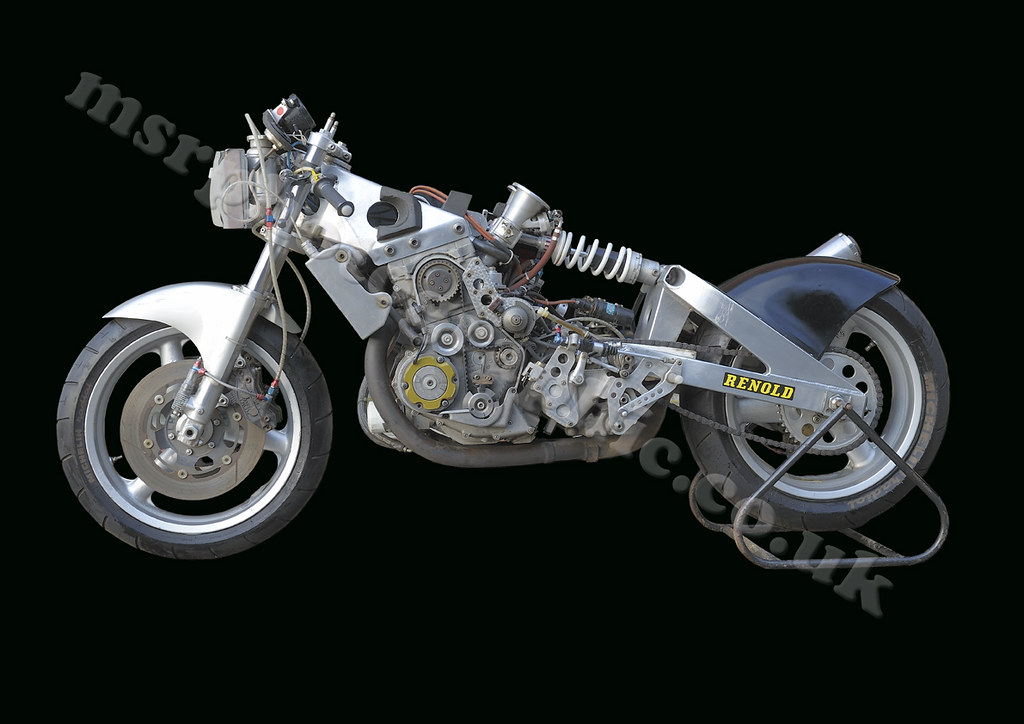
Everytime i see this engine especially now with the bellmouths i think of this one

Kinky is using a feather. Perverted is using the whole chicken
Low personal B.M.E.P.
Well, scale your imagination down to about half size. The cut engines are tiny.
Anorak
I am pretty sure i saw yours before and after it was cut....
150 vs 750
I would same although the casings were huge and heavy 40lb the cozzy was smaller than it looks, about the size of a CB350 but was 200Lb and had 75lb of spinning mass.
What happen re your carbs
Kinky is using a feather. Perverted is using the whole chicken
Bucket Racer/Crasher
Today with help from Rob at ESE I managed to get the engine running. I checked the trigger calibration and found it was still perfect(ish) despite the new cam trigger at some unknown new position. Obviously I don't understand how that works. Put the fuel pump fuse in, turned on injection, 3rd gear, pressed the button and away it went. Everything was looking good apart from the fuel which wasn't totally unexpected. I will need to go over the fuel pressure regulator as it didn't adjust at ESE but was fine when I got home. We didn't do any hard runs, just ran it through the gears using middling revs, and it was reasonably sweet. with the velocity stacks the intake is very noisy now. We ended the day with a little problem. When I was using a bit of throttle Rob was seeing water being blown out of the overflow bottle. The amount of water was dependent on throttle so I'll check compression but will probably have to remove the head and try to seal it better. All up I'm pretty happy with how it went.
Bucket Racer/Crasher
Borrowed this tool from friend Kevin to pressurise each cylinder. Waaaaaay flasher than needed but worked a treat. Cylinder #1(was #3) blows bubbles out of the radiator when pressurised. It won't be hard to fix and there are a few options.
Bucket Racer/Crasher
Well, that got tricky real quick. The motor has been taken apart down to the crankcases. Everything looks OK apart from the head gasket issue. I took the cylinders over to Kevin's workshop and we measured it on the granite table. The cylinder has a slight twist, about .003" and will rock if diagonally opposite corners are pressed. The sleeves are also about .001" below the surface of the alloy block. With the thickness of the gasket sealant around the outside that leaves plenty of clearance for a failure of the seal around each bore. The plan for tomorrow is to mount the cylinder on 3 points with the base up, with only sufficient force to hold it down but not to distort it. Then take just enough off the base of the alloy block to make it flat. Once it's flat the block can be flipped over and clamped down on parallels and using a small cutter mow a bit off the top to make it flat. Once it's flat I'll probably take about .001" off the alloy block leaving the sleeves proud. I'm not going to check how square the bores are to the top and bottom surfaces. I'd check the head as well but am going to risk it rather than open another can of worms. Kev has a brand new 6mm cutter I'm allowed to use. It should come out real nice.
No8 Wire Extraordinaire
Bit of Selleys All Clear will fix it.
Don't you look at my accountant.
He's the only one I've got.
Low personal B.M.E.P.
The cut barrels have no torsional stiffness whatsoever. Mine got decked once the new liners were in. Clamped down using the base gasket area as a datum and decked parallel to that. Liners are flush, copper head gasket - painted - and so far it's holding.
Over the years, working on FZR's of all sizes, i've noted the importance of lubing the head nuts when torquing them down. Generally, they're marginal for size in the application and any reduction in tightening torque shows as a gasket leak. 400's are particularly prone to this.
Bucket Racer/Crasher
I did think of bolting the cylinder down on the base gasket surface and decking it. Doing this worked on the Z1 without a problem. All the fasteners are lubed prior to assembly. If you have the torque setting for the head studs that would be useful. I took them down to 25nM last time but it seemed a bit light. 25 is the recommended torque for 8mm fasteners according to the spec sheet with the torque wrench.
Low personal B.M.E.P.
i went from memory. the 8mm head studs on the 400's are spec'd at 18 ft/lb. They'll take 20 ft/lb no probs - so that's what I did the cut 250 to.
Bucket Racer/Crasher
I only decked the top of the cylinder. I looked back at my own experience with a slightly twisted Z1 block and how that was clamped to a 40mm thick slab of steel to keep it flat while machining. Well that was the idea but the engine reconditioners knew better and took it off before boring with the result that the bores weren't square to the crank once it was all bolted back together. Greg also commented about his experience with these cylinders. I clamped it down as per the photo. I took a very small initial cut of maybe only .002" and that resulted in a very even cut over the whole surface with possibly a smidge lighter cut on the top of the sleeves. After that I made another cut of just the aluminium. I raised the knee less than 1 graduation(.001") which resulted in the sleeves being proud by .02mm. It should work perfectly.

Bucket Racer/Crasher
Bike is back together and fired up 2nd push down the drive. Ran it for a while warming it up and it stuttered to a stop. I toggled the power but the pump didn't build fuel pressure which I thought was odd. I topped up the fuel and tried again and it was OK. Another push down the drive and it was away. After another period it stuttered to a stop again. I suspect the fuel pump but need to look into it a bit further.
Once it was warmed up I did give it a couple of good blips. It pulls 14,000 quickly and the log file shows clean curves. Hopefully once the fuel issue is fixed and it's tuned it will rev freely and make some power.
There are currently 1 users browsing this thread. (0 members and 1 guests)
 Posting Permissions

 Reply With Quote
Bookmarks