Page 1290 of 2629 FirstFirst ... 2907901190124012801288128912901291129213001340139017902290 ... LastLast
Results 19,336 to 19,350 of 39427

Thread: ESE's works engine tuner

  1. #19336
    Join Date
    20th January 2010 - 14:41
    Bike
    husaberg
    Location
    The Wild Wild West
    Posts
    11,832
    Quote Originally Posted by Frits Overmars View Post
    No we don't; we help ourselves. Try hitting the " and then the o; that should give you a nice ö.

    I think they are still in business, but unlikely to take on small series racing cranks.
    They made the cranksfor some restored classic Bikes I think they were doing still doing some classic stuff as of 10 years ago anyway.
    But as Frits. still in business judging by Google
    http://www.hoeckle.com/en/unternehmensgruppe.html
    Quote Originally Posted by Katman View Post
    I reminder distinctly .


    Kinky is using a feather. Perverted is using the whole chicken

  2. #19337
    Join Date
    9th December 2013 - 11:35
    Bike
    1975 Kawasaki H2
    Location
    Wisconsin, USA
    Posts
    19
    For anyone interested in learning all the details of the Kim Newcombe and Konig outboard story I just finished reading Tim Hanna's book and thoroughly enjoyed it. The John Britten book Hanna wrote was very good too.


  3. #19338
    Join Date
    21st March 2014 - 22:00
    Bike
    RZ350, TZR250 3XV, TZR250 3MA, TZR125
    Location
    Hanau, Germany
    Posts
    139
    Quote Originally Posted by Frits Overmars View Post
    I thinks it's broken. Retarding the ignition dramatically will indeed put excessive heat into the piston, even if detonation, invited by the 1,4 mm squish gap, doesn't.
    It looks as though the piston ring got caught by the underside of the transfers and with a near-melting piston it doesn't need much force to break away the top land. You might try to smooth those undersides, guiding the ring back into the bore when it nears BDC.
    Thank's for the feedback Frits, will follow your advise...
    I also have put the data into EngMod and it says "deto" at 7500 rpm.


    I made a test with the bike equipped with the data logger. At around 7500 rpm the Ex temp curve for cylinder #2 don't follows the shape of cylinder #1 (same behaviour in more tests I did).


    So I played a bit with the PV opening (the stock setup starts at 3800 rpm) and came up finally with 6000 rpm. With that TUbMax droped a bit more on the lower revs area and no detos showed up again.
    So are these "detos" in the lower range because of the wrong scavaging timing at the 2/3 rpm of max power rpm?

  4. #19339
    Join Date
    18th May 2007 - 20:23
    Bike
    RG50 and 76 Suzuki GP125 Buckets
    Location
    Auckland
    Posts
    10,479
    page 1290 .....

    More people doing real Bucket stuff.

    Quote Originally Posted by Yow Ling View Post
    Quote Originally Posted by TZ350 View Post
    Click image for larger version. 

Name:	YowLing RGV sleeve.jpg 
Views:	102 
Size:	285.5 KB 
ID:	315960

    I had a look at the
    www.FXR150.co.nz site, and see there are one or two more very fast 2-strokers in the pipe line down south and a bunch of very interesting FXR's.
    Click image for larger version. 

Name:	YowLing RGV.jpg 
Views:	91 
Size:	376.5 KB 
ID:	315959
    Ive been dabbling with this engine for sometime now, TZ has posted pictures of my sleeve which is a bit of a compromise but will do in the meantime as we have some new ideas in that area.
    More picture on the original posts.

    Quote Originally Posted by bucketracer View Post
    Neds 23rwhp Engine

    After three years without a problem, Chambers is giving it a Birthday

    Attachment 236793

    Nothing to special, a real simple setup, still using the std carb and roughly polished but other wise unmodified inlet tract, other tech details were posted on page 200.
    Quote Originally Posted by kel View Post
    ... one of several problems faced when trying to coax power out of the KE, there is no inner radius to the transfer ducts, just the the liner. The attached photo shows the minor porting thus far (only about 12hrs work in the cylinder) the plan for today is to add epoxy to the liner to form a 6mm inner radius to the main transfers duct.
    This is the KE
    Attachment 236848
    Im aiming for something like this
    Attachment 236847
    Quote Originally Posted by ac3_snow View Post
    Click image for larger version. 

Name:	AC Snow 125.jpg 
Views:	70 
Size:	327.3 KB 
ID:	315962
    Well along that tune, with uni holidays at the moment I have had a time to make some progress on my bucket. so its a TF125, first attachment is the port map for its current state.
    This gives me timings of :
    Exhaust opens 81 ATDC so 200 duration
    Main transfer opens 117 ATDC so 126 duration
    and the Piston inlet ports open 74 BTDC with 158 duration.
    I'm fairly confident I have the right exhaust width for the necessary blowdown time area.
    Quote Originally Posted by Gigglebutton View Post
    Attachment 237929

    After a bit of a thrash on the dyno.......
    Well worth the hours worked on it. Next step a better ignition. Thanks guys
    Quote Originally Posted by pugs View Post
    Click image for larger version. 

Name:	Pugs Bike.jpg 
Views:	87 
Size:	61.0 KB 
ID:	315961
    Well, it's the most favorite legal fast-bike here.. At stock form, it's comparable with streetstock rs125,nsr150sp or tzm150, and smoked ninja 250R easily, but much cheaper.. & it's the only 2 stroke that still produced..
    Quote Originally Posted by Frits Overmars View Post
    Quote Originally Posted by marsheng View Post
    Thanks for info Fritz. The casing has inserts to match the 250 cranks as the casing is the same for the 440. It is a possibility to re-machine the inserts but they are already quite thin. The next is to machine the cases but I'm hesitant to do that.
    Throw the inserts out. Once upon a time, way back in the previous century, Rotax made a kart engine, the Rotax 124, by fitting a 125 cc-crank into 250cc-cases. No inserts. The radial clearance was about 5 mm. It became a world-beater.
    Quote Originally Posted by adegnes View Post
    Here's a thread with lot's of loctite info, if anyone's interested.
    http://advrider.com/index.php?threads/loctite.265016/
    Quote Originally Posted by seattle smitty View Post
    (Insert long sigh here) I hate, I hate to ask this, because I know I've seen the answer somewhere, ... but could one of you skilled info-locators please once-and-for-all-time give a detailed step-by-step set of search directions here, to show us how to find something WITHIN the ESE superthread.
    Seattle Smitty's original post, is the start of a short thread with many tips on how to search and find good stuff on the ESE thread or any thread for that matter.

  5. #19340
    Join Date
    24th January 2014 - 08:12
    Bike
    1988, Yamaha RD350 YPVS
    Location
    Germany
    Posts
    109
    Blog Entries
    1
    Hey Folks!

    I am searching for a tiny pickup which I may mount under a fanwheel. I allready ordered the smalles one Ignitech offers, but it I still have to work on it
    Click image for larger version. 

Name:	20150509_123854.jpg 
Views:	104 
Size:	628.6 KB 
ID:	315564
    Does anyone know a really Small Pickup?
    Thanks a lot!
    Tim

  6. #19341
    Join Date
    18th March 2013 - 04:44
    Bike
    75 RD250b, 76 250C , 78 250E
    Location
    Poland
    Posts
    171
    TZR 125 had small pickup , from what I remember it was almost 0,5 height of typical scooter one.

  7. #19342
    Join Date
    23rd September 2014 - 19:35
    Bike
    Peugeot spx
    Location
    Norway
    Posts
    602
    Quote Originally Posted by Tim Ey View Post
    Hey Folks!

    I am searching for a tiny pickup which I may mount under a fanwheel. I allready ordered the smalles one Ignitech offers, but it I still have to work on it
    Click image for larger version. 

Name:	20150509_123854.jpg 
Views:	104 
Size:	628.6 KB 
ID:	315564
    Does anyone know a really Small Pickup?
    Thanks a lot!
    Tim
    You could use the hall sensor for the Power-Spark ignition, or any other small hall sensor.

    Wire it like this:
    Click image for larger version. 

Name:	Hall to inductive DCCDIP.jpg 
Views:	121 
Size:	356.3 KB 
ID:	315565

  8. #19343
    Join Date
    12th May 2011 - 23:52
    Bike
    razor scooter(pink)
    Location
    Australia
    Posts
    371
    Quote Originally Posted by FastFred View Post
    It is a NSR250 MC21 cylinder grafted onto a rotary valve Suzuki GP100 bottom end. The motor needs a long rod so as to be able to fit an adapter plate for mounting the cylinder.

    From all accounts with the long rod and 12mm extra width in the cases and the old super large transfer ducts in the original GP cases this engine should be exploring the outer limits of of crankcase volume. Hopefully TeeZee will post the crankcase volume and CR figures.

    Reed engines like a crank case com ratio of about 1.3:1 but TeeZee is all about maximizing the case volume on his RV engine. I guess if anyone was wondering if there is an upper limit for case volume on rotary valve engines then I guess we are about to find out.
    with a 48mm stroke 105mm rod is 2.2:1. Ultra long rods do weird things to carburation and the power curve. Case volume is going to depend on how hard it's revved.

  9. #19344
    Join Date
    30th September 2008 - 09:31
    Bike
    Suzuki GP125 Bucket
    Location
    Auckland
    Posts
    1,969
    Some posts on crankcase volume.

    Quote Originally Posted by Frits Overmars View Post
    In order to take full benefit of a large crankcase volume you need free-flowing transfer ducts. That means: large cross sections, short gas column lengths and large time.areas.
    Quote Originally Posted by Frits Overmars View Post
    An Aprilia RSW125 has a TDC crankcase volume of 650 cc. An RSA125 has 675 cc and a bit more power. See where this is going?
    Quote Originally Posted by Frits Overmars View Post
    Increasing the crankcase volume has several consequences. One of those is that the flow through the carb will be more even, less violent, which usually results in a leaner mixture.
    Quote Originally Posted by Frits Overmars View Post
    make sure your crankcase volume is not too small. I have seen lots of cases with too little volume, but none with too much yet. The optimum primary compression ratio is probably less than 1.3.
    Quote Originally Posted by wobbly View Post
    In my testing I have found no more power going to a bigger than 1.3 case on a reed engine.
    This is a function I believe of the efficiency of the rotary valve intake system being able to better fill the case at high rpm,using the 1.24 as Frits has described , but having said that I have only just crept over 50 Hp with a 125 reed, and the Aprilia RV made alot more than that, so maybe a huge case simply isnt needed at the lower bmep.
    Quote Originally Posted by Frits Overmars View Post
    Off the pipe you need a pump with the minimum amount of dead volume; on the pipe you'll want the engine to breathe directly from open air (mixed with a bit of fuel and oil). But that oil has to pass through the crankcase to keep the bearings happy. Hence my 24/7-setup
    Quote Originally Posted by wobbly View Post
    There are several issues involved with the reed engine and its case volume - that has effects not seen in an RV setup. The bigger the case the less are the pressure swings from piston movement and the pipe action ( assuming the same depression at the Ex port created by the pipe ) around BDC.

    This changes the tuned frequency of the case vol, but this also requires thinner reeds to get them open fast and far enough. Of course changing the reed stiffness then changes the intake tuned frequency,they then hit the reed stops and flutter uncontrollably - and so it goes on and on.

    I tried machining the KZ10B case back to make the volume smaller as I already had the 5mm laser cut spacer from a test making the case bigger by pushing the reed block outward. This failed miserably, so of course you then go the other way - this also failed,but only partially in that I did not then try differing reeds to compensate as I should have.

    Adding a spacer behind the reed block HAS NOTHING to do with the intake length, this is already as short as it can be, with the rubber manifold recessed into the reed stuffer.

    All I can say is that from a huge amount of sims and real world reed engine testing, that a very well tuned engine with good power capability ( bmep ) likes the case down near 1.3.

    An engine with less power ( bmep ) capability ( for whatever reason ) tends to respond better to the case closer to 1.4.
    When you are making 8 Bar and or 14 Bar BMEP of course these exceptions to the norm tend to prove the rule of thumb.
    Quote Originally Posted by Frits Overmars View Post
    The smaller crank will give the pipe more crankcase volume to breathe from. This larger volume will also lower the resonance frequency of the inlet system, hence the drop at high rpm. It can be compensated with a shorter inlet tract, a bigger carb diameter and a later inlet closure. To put it real simple: if you have more volume, you need more time to fill it. But more time, i.e. later closure, has adverse effects at low revs. So my preference is a shorter tract (unless you go the 24/7-way and employ a reed for the low revs, and swing it out of the way at high revs).
    Quote Originally Posted by Frits Overmars View Post
    crankcase compression ratio = TDC-volume / BDC-volume

    TDC-volume = 680 cc (I'll take your word for it)

    BDC-volume = TDC-volume - cylinder volume

    cylinder volume = 173,7 cc

    BDC-volume = 680 - 173,7 = 506,3 cc

    crankcase compression ratio = 680 / 506,3 = 1,343

    And now for some reverse engineering:
    what TDC-volume will give a crankcase compression ratio of 1,43?

    TDC-volume = comp.ratio / (comp.ratio - 1) * cylinder volume

    TDC-volume = 1,43 / 0,43 * 173,7 = 577,7 cc.

  10. #19345
    Join Date
    13th April 2009 - 22:30
    Bike
    Maico Bimota 250
    Location
    Christchurch
    Posts
    275
    Quote Originally Posted by PVO View Post
    For anyone interested in learning all the details of the Kim Newcombe and Konig outboard story I just finished reading Tim Hanna's book and thoroughly enjoyed it. The John Britten book Hanna wrote was very good too. [
    ]

    Great Book. Kim was supposed to work for Maico but the factory was not ready for him to start. He looked at Konig and the rest is history. From the book the crank and cases had to be hand picked to get a good set.

    As for the Konig 350, the bolts holding the head down onto the cylinder go through 40 mm of free air, there is no head gasket and no locating dowels. If I clamp the 2 heads together, there is a 2 mm gap around the outside from warpage from the bolts being tightened and twisting the head !!

    I'm not even sure how to remachine these to make it work correctly. One combustion chamber even has a different volume.


    Cheers Wallace.
    ........Rules are for fools and a guide for the wise ..............

    http://www.marshland.co.nz

  11. #19346
    Join Date
    13th September 2014 - 05:14
    Bike
    '76 RD-400C
    Location
    The Emerald City
    Posts
    240
    OLD recipe for sealing Konig's (see below) gasket-less heads: Go to an old, long-established paint store, ask the man to go in the back and get a small can of silver (aluminum) paint, the one that has been sitting on the shelf the longest. Caution him please DO NOT shake up the can. At home, pour off the separated liquid into a jar. Pour maybe half of it back into the solids in the paint can, stirring it in until you have a heavy aluminum paste. That's your sealer; apply it to mating surfaces with a fingertip just before assembly.

    It used to work, anyway.

    When the four-cylinder Konigs were raced here, lots of owners bought Zak (ref. previous post) heads, of better design with better cooling, better aluminum, better casting and machining. But the original heads, maybe re-machined, will do. In helping another guy with one of these engines, I had him install longer studs and made thick aluminum plates that went over the outside of the heads. Along with this, I modified the heads to get water flowing around the backside of the head, around the plug, with this secondary water jacket being sealed by the new plate, and provision for an o-ring around the plug. Not my original idea, of course.

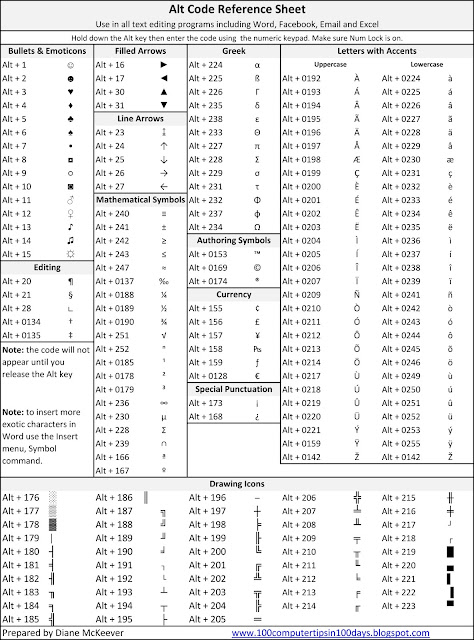
    Konig: I can't get Frits' umlaut technique to work; I can't get two charactors (the " and the o) to go into one space. Anybody?

    EDIT --- The case halves can pull apart (beer-can aluminum). Some guys modified the cases to take big through-bolts in place of or in addition to the studs.

    MORE EDIT -- Wallace, in your photo, notice the flange areas in the center of the heads. I have seen guys provide two additional studs to add a little clamping pressure in that area. Of course it's pretty soft and weak there, so you might weld in some stiffeners, prior to any machining you have to do in any case . . . again, as many of them came, a Konig was a kit, out of which you could eventually have an engine.

  12. #19347
    Join Date
    29th March 2013 - 14:57
    Bike
    Honda NS-1 / Gas Gas EC-125
    Location
    Portugal
    Posts
    116
    Some cooper sheet and use it to the inside/cylinder surface and then RTV for the outside?

  13. #19348
    Join Date
    23rd September 2014 - 19:35
    Bike
    Peugeot spx
    Location
    Norway
    Posts
    602
    Ööööööö - it's a separate character, probably not present on your american keyboard... I like the aluminium paint sealer tip!

  14. #19349
    Join Date
    5th January 2013 - 13:23
    Bike
    89 KX500
    Location
    USA
    Posts
    68

    ALT Codes

    This may help, Smitty.

    ALT key and 0246 will generate ö.


  15. #19350
    Join Date
    13th April 2009 - 22:30
    Bike
    Maico Bimota 250
    Location
    Christchurch
    Posts
    275
    Quote Originally Posted by senso View Post
    Some cooper sheet and use it to the inside/cylinder surface and then RTV for the outside?
    I want to use CU sheet for gaskets and I'll use several thickness so we can adjust the squish. I don't think the deck heights are the same. I will also pin the barrel, gasket and head so they align.

    I will add some weld into the head to strengthen it but still deciding how much.

    I've been using the VHT copper spray and it works very well. (I guess the same idea as the aly paint)

    Cheers Wallace
    ........Rules are for fools and a guide for the wise ..............

    http://www.marshland.co.nz

Thread Information

Users Browsing this Thread

There are currently 148 users browsing this thread. (0 members and 148 guests)

Posting Permissions

  • You may not post new threads
  • You may not post replies
  • You may not post attachments
  • You may not edit your posts
  •